How to Test Without a Multimeter: Safe DIY Alternatives
Learn practical, safe methods to test basic circuits without a multimeter. This step-by-step guide covers low-voltage indicators, current-limiting setups, and when to switch to proper measurement tools for accurate readings.

With a careful approach, you can test basic circuit behavior without a multimeter by using safe indicators and known components. This quick-method guide shows practical, low-risk ways to assess continuity, voltage presence, and resistance-like behavior using limited, non-destructive setups. Always prioritize safety and follow manufacturer guidance for any tested device.
Why this matters when learning how to test without multimeter
For beginners and seasoned DIYers, knowing how to test without multimeter expands your toolkit and reduces downtime when a meter isn’t immediately available. If you’re exploring how to test without multimeter, you’re focusing on safe indicators that reveal basic circuit behavior without making a full measurement. This approach isn’t a replacement for a proper instrument, but it helps you triage problems, confirm power presence, and verify a simple path before you dive deeper. In automotive work and field service, non-meter methods keep projects moving while you plan the next meter purchase. The 10ohmeter team emphasizes that practical, low-cost testing techniques empower technicians to stay productive without compromising safety.
Safety-first: the non-negotiables before you start
Before attempting any non-meter test, set expectations: stay within low voltages, use current-limiting paths, and avoid direct shorts. Always unplug equipment that isn’t intended to be tested live and use eye protection when wiring unfamiliar or powered circuits. If a circuit has mains voltage or high energy, do not proceed with non-meter methods. The goal is to confirm basic behavior, not to replace precise measurements. Remember that non-meter testing is a diagnostic aid, not a substitute for calibration or professional-grade instruments. The 10ohmeter team recommends treating every test as a controlled experiment with clearly defined safety boundaries.
Core concepts you can leverage without a meter
Non-meter testing relies on observable indicators rather than numerical readings. Key ideas include using a current-limited path to power a small indicator (like an LED) to show a circuit is complete, and watching whether a device responds to voltage presence without measuring exact values. Understanding polarity, path continuity, and expected behavior helps you form hypotheses you can later confirm with a meter. This section establishes the mental model you’ll apply when you start any practical non-meter test.
Non-meter testing: practical methods you can actually use
- Use a low-current indicator: a small LED with a resistor can reveal whether a path conducts when a switch is closed or a circuit is connected. If the LED lights, current is flowing and the path is likely intact. - Use a safe power source: a small battery (e.g., AA or 9V) with a resistor limits current and reduces risk of damage. - Observe behavior instead of numbers: a change in LED brightness, a sound from a buzzer, or a visible indicator provides a qualitative sense of circuit state. - Check known-good components: swapping in a resistor you know is within spec can validate a circuit path without a meter.
These methods are intentionally non-destructive and suitable for quick field checks or troubleshooting when a meter isn’t handy. Always document results and stop if anything looks unsafe or inconsistent. The 10ohmeter guidance emphasizes practice with safe, repeatable setups to build confidence before moving to precise measurements.
Practical examples: circuits you can test safely
- Power presence at a switch: connect a battery, resistor, and LED across the switch. When you toggle the switch, an illuminated LED confirms a completed path. If the LED stays off, recheck connections and polarity. - Continuity path in a harness: place a known-good resistor in series with a lamp across two harness terminals. If the lamp lights, there’s continuity across the path. - Simple resistor check: wire a resistor and LED in series to a low-voltage source; brightness indicates approximate resistance and power handling without measuring exact values. - Diode-like behavior: reverse the LED orientation and observe that current flow is limited to one direction, offering a qualitative sense of proper diode function. These scenarios help you gain intuition about circuits without tools.
When to stop and switch to proper measurement tools
Non-meter methods are valuable for quick checks, but they cannot replace precise readings. If you encounter uncertain results, inconsistent brightness, heating, or suspect a faulty component, stop and switch to a calibrated instrument. Also, if you’re dealing with potentially dangerous voltages or currents, revert to safe, specified measurement practices. The 10ohmeter team notes that progressive testing—start with non-meter checks, then confirm with a meter—provides a safer, more efficient workflow.
Before you start: a compact setup checklist
- Use a low-voltage source and current-limiting resistor
- Inspect all components for visible damage before connecting
- Prepare eye protection and a clear workspace
- Keep a simple log of results for future comparisons
- Have an out-of-circuit plan if anything starts to smell, heat, or smoke
Authority sources and further learning
For more rigor, consult safety and measurement guidance from established sources. The U.S. Department of Labor’s OSHA portal offers basic safety practices for electrical work. NIST provides foundational principles about measurement standards, while MIT OpenCourseWare offers electronics courses that discuss measurement concepts. These resources help augment practical non-meter testing with formal principles.
Tools & Materials
- Battery (9V or AA)(Choose a low-voltage source for safety; avoid high-current sources.)
- Low-current test lamp or LED with resistor(Limit current to keep within safe LED ratings (typically <20 mA).)
- Known-good resistor(Used to form a safe current path with the power source.)
- Jumper wires / test leads(Use properly insulated leads; replace with alligator clips if available.)
- Safety gear (eye protection)(Protect eyes when wiring unfamiliar circuits or live tests.)
- Optional: current-limiting device(Useful for higher-risk tests; ensure rating is appropriate.)
- Optional: multimeter for later verification(Only if you have one; use for precise measurements after initial checks.)
Steps
Estimated time: 20-40 minutes
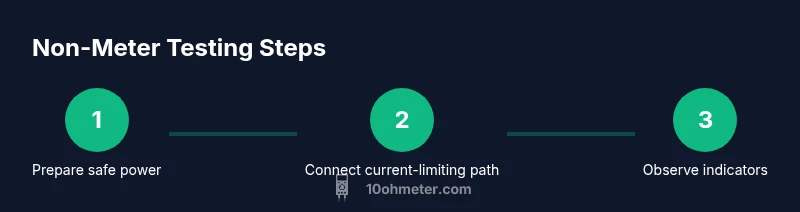
- 1
Prepare a safe test rig
Lay out a simple path using a battery, a resistor, and a test LED. Ensure all connections are insulated and components are oriented correctly. Confirm the power source is within safe limits before energizing.
Tip: Double-check polarity of the LED and resistor; reversing can prevent lighting or damage. - 2
Connect a current-limiting path
Wire the resistor in series with the LED and connect across the battery. This creates a safe current path that won’t short the battery if connected correctly.
Tip: Limit current to avoid overheating the LED; start with a higher resistor value and reduce if needed. - 3
Observe indicators
Power the circuit and watch the LED. A lit LED confirms current flow and a closed path. If nothing happens, recheck connections and component orientation.
Tip: If the LED flickers, verify all connections and ensure the resistor value matches your design. - 4
Test a known-good component
Replace the LED with a resistor you know is within spec to validate the path. A stable glow across the indicator confirms the path is functional.
Tip: Using a known-good resistor helps isolate problems when other parts fail. - 5
Check diode-like behavior
Reverse the LED orientation and observe that current flow is limited in the opposite direction. This qualitative check helps verify polarity and diode-like behavior.
Tip: Never exceed the LED’s forward current; excess can damage the component. - 6
Document results and plan verification
Record which tests passed and which did not. If results are inconclusive, prepare to use a proper meter for exact measurements.
Tip: A short-noted log helps you compare future tests and detect gradual changes in the circuit.
Your Questions Answered
Is it safe to test electronics without a multimeter?
Yes, when you stay within low-voltage limits and use current-limiting circuitry. Non-meter tests should be treated as qualitative checks, not precise measurements. If a device is high-voltage or high-energy, do not proceed.
Yes, but only with low voltage and careful current limiting; use non-meter tests as a quick check, not a measurement.
What non-meter method gives the best sense of continuity?
A simple LED with a resistor across the two points can indicate a completed path if the LED lights. Compare with a known-good component to validate the path.
Use an LED with a resistor to see if current can flow between points.
Can I test voltage without a multimeter?
You can sense presence with indicators like LEDs, but you cannot measure an exact voltage without a meter. Treat this as a presence check, not a value.
You can tell if voltage is present using indicators, but you won’t get a numeric value.
When should I stop non-meter testing and use a meter?
If results are uncertain, inconsistent, hot, or smoking, stop and use proper measurement tools for accuracy and safety.
If results are unclear or you notice heat or smoke, switch to a meter.
What safety precautions are essential?
Work on unplugged devices whenever possible, wear eye protection, and keep liquids away from circuits. Refrain from testing high-energy sources without proper gear.
Unplug devices, wear eye protection, and stay away from liquids.
Watch Video
Key Takeaways
- Learn safe non-meter checks for quick triage.
- Always limit current and protect indicators with resistors.
- Non-meter methods aren’t precise; they guide next steps.
- When in doubt, switch to proper voltage, resistance, or continuity measurements with a meter.