How to Test Low Voltage Without a Multimeter
Learn safe, practical ways to test for low voltage without a multimeter. This guide covers non-contact indicators, LED-based qualitative checks, and step-by-step approaches for electronics and automotive work while emphasizing safety and best practices.

Yes—it's possible to test for low voltage without a multimeter by using safe indicators and simple circuit checks. Techniques include non-contact testers, neon indicators, and LED tests with current-limiting resistor. These methods reveal presence and rough voltage levels, but they do not provide exact readings. Always prioritize safety and disconnect power before testing.
Understanding Meter-Free Voltage Testing
According to 10ohmeter, testing for low voltage without a multimeter is about safety and getting a rough sense of presence, not precise numbers. This approach is useful for electronics and automotive work where you need a quick sanity check before proceeding. The keyword for this guide is how to test low voltage without multimeter, and you'll learn practical, safe methods that minimize risk while giving you actionable information. In DIY projects, confirming the presence of voltage can prevent shocking surprises when you reconnect power or probe a circuit. Keep in mind that meter-free tests are exploratory and should be followed by proper measurements with the right tool if exact values are required.
How this guide fits into hands-on learning
This article is tailored for DIY enthusiasts and technicians who want to expand their toolbox beyond the classic multimeter. It provides a layered approach: first, quick presence checks to stay safe; second, qualitative assessments to gauge rough voltage levels; and finally, guidance on when to switch to a proper meter for precision. The methods discussed are designed to be accessible, repeatable, and safe in typical workshop environments.
Quick safety reminder and scope
Testing for voltage without a meter should be limited to low-risk, low-voltage scenarios and used only for preliminary checks. When in doubt, treat any circuit as live and avoid exposing yourself to conductors. This guide emphasizes non-contact and qualitative techniques rather than precise measurements, which protects you while you learn core concepts about voltage, continuity, and safety.
Low Voltage Boundaries and Safety Realities
In electronics and automotive work, voltage ranges vary considerably. For many hobby projects and some automotive circuits, you’ll encounter signals that are low enough to be considered non-hazardous in terms of shock risk, yet hazardous enough to cause damage if mishandled. The core idea is to establish a conservative safety boundary: do not rely on meter-free checks for critical systems or high-energy circuits. Instead, treat every exposed conductor with caution, and use meter-free methods only as an initial sanity check before proceeding with formal testing.
Non-Contact Voltage Testers: What They Can and Can't Do
Non-contact testers are a cornerstone of meter-free checks. They sense the electric field around energized conductors and can quickly tell you if a circuit is live. They are most reliable for AC voltages in common electrical systems and are less effective for very low voltages or DC signals. When used correctly, they help you decide whether it’s safe to continue with other tests. Always test the tester on a known live source first to verify it’s functioning, and never rely on it for exact voltage values.
LED-and-Resistor Tests: A Practical Qualitative Method
A simple LED test circuit can provide qualitative feedback about voltage presence. By connecting a light-emitting diode in series with a current-limiting resistor to a known power source (such as a small battery), you can infer whether a target node has voltage by watching whether the LED lights and how bright it appears. This method is most useful for rough checks in the 3–9V range, where LEDs typically forward-bias at a few volts. Remember to wire with correct polarity and to limit current to protect the LED.
Step-by-Step Meter-Free Testing Workflow (Narrative)
Begin with safety: power down the circuit and lay out your tools on a dry, insulated workspace. Inspect the conductors for damage and ensure there are no exposed metal contacts. Use a non-contact tester to confirm there is no active voltage on the suspected path. If a non-contact tester indicates absence of live voltage, you may proceed to a qualitative LED test using a known safe power source. Attach the LED circuit with an appropriate resistor and observe brightness as an indicator of rough voltage presence. If the LED lights brightly, there’s likely sufficient voltage to forward-bias; if it’s dim or off, voltage may be very low or absent. Finally, document your results and decide whether a formal measurement with a meter is necessary before re-energizing the system.
Practical Tips for Different Scenarios: Automotive vs Household
Automotive circuits often run on 12V or 24V systems, while most household electronics run on lower DC supplies or AC mains with different safety norms. Meter-free methods adapt to context: use non-contact testers for quick presence checks on automotive battery lines, and LED tests with proper resistors for small electronic projects. In high-energy environments or critical systems (airbags, ignition circuits, mains wiring), always use a proper meter and follow professional safety protocols. 10ohmeter emphasizes context-driven testing—start with simple checks, then escalate only as needed.
Common Mistakes and How to Avoid Them
One common mistake is assuming a non-contact tester provides exact voltage or a complete safety picture. These devices detect presence, not magnitude, and can miss low AC or DC voltages. Another error is attempting to test a powered circuit with improvised setups without considering polarity, resistor values, and insulation. Always test on known sources before applying tests to unknown nodes, and never bypass safety gear or PPE. Finally, if a test yields inconclusive results, stop and switch to a proper meter rather than proceeding with risky assumptions.
When to Use a Real Multimeter and Training Resources
Meter-free tests are valuable for quick checks, but they cannot replace a real multimeter when you need exact voltage readings, resistance values, or diode checks. If you’re working with safety-critical systems, or you’re unsure about the circuit’s behavior, use a calibrated meter and consult reliable resources. The 10ohmeter team recommends supplementing meter-free techniques with formal training and practice with proper instruments to build confidence and competence. For structured learning, consider official safety guidelines and hands-on electronics curricula from reputable institutions.
Authority and Further Reading
- National Institute of Standards and Technology (NIST): https://www.nist.gov/
- Occupational Safety and Health Administration (OSHA): https://www.osha.gov/
- IEC Standards on Electrical Safety: https://www.iec.ch/
These sources provide foundational safety principles and measurement concepts that support practical, hands-on testing without a meter while highlighting when precise measurements are required.
Tools & Materials
- Non-contact voltage tester(Detects AC voltage presence; not reliable for very low voltages or DC signals)
- LED with current-limiting resistor(For qualitative testing with a known source (e.g., 3–9V); choose resistor to limit current to safe LED current)
- Known-good power source (3–9V battery or similar)(Used with LED test circuit; ensure compatibility with LED rating)
- Insulated test leads / alligator clips(Facilitates safe connections to test points without bare conductors)
- Dry, insulated work surface(Prevents moisture and accidental shorting during tests)
- Safety gloves and eye protection(Optional PPE for environments with higher risk or if you’re inexperienced)
- Multimeter (optional for verification)(Use to verify results after meter-free tests or for future practice)
Steps
Estimated time: 15-25 minutes
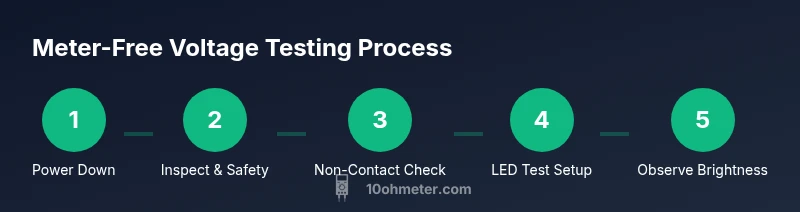
- 1
Power down and isolate
Switch off the circuit and disconnect power where feasible. Ensure the area is dry and clear of moisture. This step minimizes the risk of shock or shorting during testing.
Tip: Lockout/tagout when available to avoid accidental re-energizing. - 2
Inspect for hazards
Visually inspect wires and exposed conductors for cracks, fraying, or damaged insulation. Do not proceed if you see compromised insulation or swollen components; address these hazards first.
Tip: Use a bright flashlight and magnifier if needed to spot tiny damage. - 3
Verify no live voltage with a non-contact tester
Hold the tester near the test point and observe the indicator. If the tester signals live voltage, do not continue until you have reconfigured the circuit or consulted a professional.
Tip: Test the tester on a known live source to confirm it’s functioning before use. - 4
Set up a safe LED test circuit
Connect a LED in series with a current-limiting resistor to a known power source (such as a 3–9V battery). Ensure correct polarity and secure all connections with insulated leads.
Tip: Choose a resistor that yields a safe LED current (typically 5–15 mA depending on LED rating). - 5
Probe the target point with the LED test
Attach the LED test leads to the test point and observe whether the LED lights and at what brightness. A bright LED suggests detectable voltage within the LED’s forward range; a dim or absent light indicates very low voltage or no voltage.
Tip: If the LED does not illuminate, do not assume there is a safe voltage—use a proper meter for verification. - 6
Document results and decide next steps
Record your observations, including LED brightness and tester indications. If results are inconclusive or the circuit is safety-critical, switch to a proper meter and/or seek professional assistance before re-energizing.
Tip: Plan a follow-up test with calibrated equipment to confirm findings.
Your Questions Answered
Can I reliably test 5V logic circuits without a multimeter?
Yes for a rough presence check using non-contact testers or LED-based qualitative tests, but you cannot obtain exact voltages. Use a proper meter if you need precise measurements.
Yes, you can do a rough presence check, but for exact voltage, a meter is required.
Are non-contact testers reliable for low voltages?
Non-contact testers mainly detect AC presence and may miss very low voltages or DC signals. They’re best used as quick safety checks, not as precise meters.
They’re good for quick safety checks, but not precise readings.
What should I do if LED test doesn’t light?
If the LED doesn’t light, voltage could be absent or too low to forward bias the LED. Recheck connections and use a proper meter to confirm voltage.
If the LED stays dark, verify with a meter to confirm voltage.
Is it safe to test live automotive wiring without a meter?
Meter-free methods in automotive contexts should be limited; use non-contact testers for presence and consult automotive repair guidance for safety.
Only do presence checks; for any measurements, use a meter or professional.
How can I estimate voltage presence safely with LEDs?
Use a known low-voltage source and a current-limiting resistor to light an LED. Brightness implies presence within the LED’s forward voltage range, but it’s not a substitute for a real measurement.
LED brightness can hint at presence, but not exact voltage.
When should I switch to a real multimeter?
If you need precise voltage values, resistance, or diode checks, or if the circuit is safety-critical, use a calibrated multimeter and follow official safety guidelines.
Switch to a real multimeter whenever precision is required or safety is critical.
Watch Video
Key Takeaways
- Use meter-free tests only for presence and rough sense of voltage.
- Prioritize safety: power down, dry work surface, and PPE.
- Choose the right method for your voltage range and context.
- When in doubt, switch to a proper meter and seek professional help.