How to Fix Multimeter Probe: Step-by-Step Guide
Learn safe, actionable methods to diagnose, repair, and test a damaged multimeter probe. This DIY guide from 10ohmeter covers inspection, repair options, and maintenance to extend probe life.

By the end of this guide you will know how to fix a multimeter probe and restore reliable readings. You’ll inspect the probe tip and insulation, clean or replace the metal contacts, check the connector jack, and reassemble with proper strain relief. Safety comes first: unplug circuits, avoid live testing, and use insulated tools during the repair.
Assessing the Damage: what to inspect on the probe
A failed multimeter probe typically shows up as intermittent readings, poor contact, or visible wear. Start with a visual inspection of the tip, insulation, and the body for cracks or burns. Check the metal conductor inside the probe housing for kinks or broken strands. If you see corroded contacts, bent pins, or melted plastic, plan for a replacement or more extensive repair. Even if only part of the probe looks fine, a hidden fault can produce misleading measurements. Use a magnifier if needed to spot micro-frays in the conductor or pin oxidation. Remember that tip geometry matters: worn or rounded tips reduce contact area and stability. Always cross-check with a known-good connector or a reference resistor to gauge whether the probe is behaving consistently across different measurements.
Safety-First: prepare your workspace and avoid hazards
Repair work should happen in a clean, dry area away from water, heat, and open circuits. Disconnect the multimeter from all circuits and remove the battery if applicable. Place small parts in a tray to prevent loss. Use insulated tools and wear eye protection when soldering or stripping wires. Ensure you have good lighting and a smoke-free environment. If you suspect any damage to the meter body or internal wiring, consider pausing repairs and assessing professionally. Never repair a live circuit or attempt to force a faulty probe into a socket that is not designed for it. Safety first protects both you and your equipment.
Verifying suspected failure with simple tests
Before disassembly, perform a quick check: plug the probe into the meter and test on a known reference source (like a precise resistor or a calibrated voltage source) while observing the readings. If readings drift, jump or refuse to stabilize, suspect tip contact or conductor faults. Use the meter’s own continuity beeper to systematically test different segments of the probe—tip, shield, and the connection to the plug. Document any irregularities, such as inconsistent beep, high resistance, or intermittent contact. These tests help you decide whether the failure is localized to the tip, the connector, or internal wiring.
Cleaning and prep for repair
If you see grime, oxidation, or light corrosion on metal contacts, use isopropyl alcohol (at least 90%) and a lint-free cloth to clean. For stubborn residue, a small amount of flux cleaner can help. Do not aggressively scrape plastic housings; use a plastic-safe tool. After cleaning, inspect the tip under magnification for nicks or flattening. If the tip is damaged, you’ll likely need to replace it. For internal issues, take photos before disassembly so you can re-create the original wiring order. Keep screws organized and note any color-coding used by the original design.
Replacing the tip and conducting wires: a careful procedure
Replacing a worn tip requires careful handling of the internal wires. Desolder or remove the old tip according to the probe’s design, then trim and prepare the conductor ends. Solder a new tip or connector that matches the original profile. Maintain correct polarity and ensure there is a solid solder joint with no cold solder connections. Use flux to improve wetting and a small amount of heat to avoid damaging plastics. If the wire strands are broken, splice the conductors with matching gauge and insulate each conductor separately before reassembling. Use heat shrink tubing to cover exposed joints and to prevent shorts between adjacent conductors.
Strain relief, insulation, and connector integrity
Strain relief is essential to prevent wire fatigue from bending or yanking. Slide heat shrink over the joint, apply heat, and ensure a snug fit against the housing. Reapply insulation to any exposed metal and fix the outer sheath so it cannot slip. Check the connector plug for bent pins or loose housings; tighten or replace as needed. A robust strain relief reduces the chance of future breaks and ensures the probe remains durable under repeated use. When reconnecting the plug, make sure the connection is mechanically secure before applying power.
Reassembly and functional testing
Reassemble the probe assembly carefully, aligning any grooves or guide pins. Confirm that the tip seats firmly in its pocket and that insulation covers all conductive paths. Reconnect to the meter and perform a controlled test on a known reference; compare readings with a calibrated standard. If readings are stable and match the reference within acceptable tolerance, the repair is successful. If not, recheck the joints for cold solder or loose connections and re-test. Document the repair steps for future reference and potential warranty claims.
Troubleshooting common readout issues after repair
If you still observe drift, check for residual oxidation on contacts, re-clean joints, and re-solder if needed. Check the insulation for micro-cracks that could cause intermittent shorts in the shield. A miscalibrated meter or a damaged jack can masquerade as a probe fault, so verify the entire measurement chain. If the problem persists after re-inspection, consider replacing the probe tip assembly entirely or consulting a professional for a more thorough examination.
Maintenance tips to extend probe life
Regular inspection after each use helps catch wear early. Clean tips and connectors after measurement, store probes away from heat and moisture, and avoid bending the conductor beyond its designed radius. Use heat shrink and proper strain relief from day one to slow fatigue. Periodically verify integrity with a quick reference test to ensure the probe remains within tolerance. For critical measurements, use replacement probes with known calibration history to maintain reliability. By establishing a routine, you’ll minimize the risk of sudden probe failure.
],
Tools & Materials
- Replacement probe tip(Choose a tip style and size compatible with your meter's probe shaft and connector.)
- Soldering iron (25-40W)(Fine-tip preferred for small joints; temperature control helps prevent damage.)
- Solder (lead-free) and flux(Flux improves wetting; use rosin flux for clean joints.)
- Desoldering braid (wick)(For removing old solder without lifting pads.)
- Heat shrink tubing (various diameters)(Insulates and provides strain relief at joints.)
- Electrical tape (premium, non-conductive)(Additional insulation and securing conductors.)
- Precision screwdriver set(For any small screws inside the probe housing.)
- Isopropyl alcohol 99% or higher(Cleans residues without leaving water.)
- Contact cleaner spray (optional)(Useful for stubborn oxidation on contacts.)
- Small needle-nose pliers(Grasping and bending conductors safely.)
- Multimeter for testing(To verify continuity and resistance after repair.)
- Magnifying glass or loupe (optional)(Helps inspect tiny contacts and solder joints.)
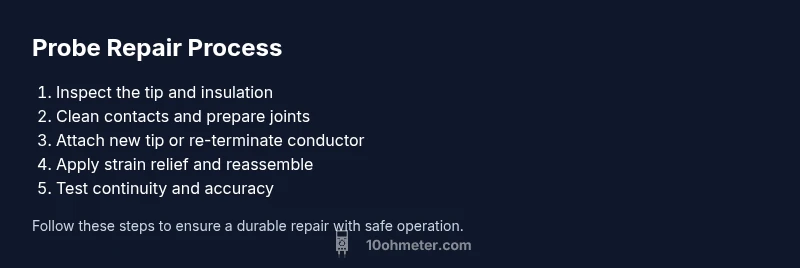
Steps
Estimated time: 1 hour 30 minutes
- 1
Power down and unplug
Turn off the multimeter and disconnect any power sources. Remove the battery if applicable and set the meter to a safe, low-voltage range before starting work.
Tip: Double-check power is off using a separate test source before touching any wiring. - 2
Inspect tip and insulation
Look for nicks, bends, and missing insulation on the tip. Examine the outer sheath for cracks or melted areas that could cause shorts.
Tip: Use adequate lighting and magnification to spot fine damage. - 3
Remove damaged tip/wire section
If the tip is removable, detach it carefully. If the conductor is damaged, trim back to solid copper with clean insulation intact.
Tip: Keep track of the original wiring order to reassemble correctly. - 4
Clean and prepare joints
Clean contact surfaces with isopropyl alcohol. Remove oxidation and residues that would prevent a clean solder joint.
Tip: Avoid excess liquid; use a lint-free wipe and gentle agitation. - 5
Solder or attach new tip
Attach a replacement tip or re-terminate the conductor with a proper joint. Use flux and heat just long enough to wet the joint without overheating plastics.
Tip: Ensure a solid, smooth solder fillet with no cold joints. - 6
Apply strain relief and insulation
Slide heat shrink over joints, shrink with heat, and seal exposed conductors. Reassemble housing around the tip with proper alignment.
Tip: A good strain relief reduces fatigue on internal wires. - 7
Reassemble and test continuity
Put the probe back into its housing, connect to the meter, and test on a known resistor or reference source.
Tip: Compare to a calibrated standard to verify accuracy. - 8
Document and monitor
Record the repair details and date. Periodically re-check the probe’s performance in routine use.
Tip: Keep a small repair log for future troubleshooting.
Your Questions Answered
Why would a multimeter probe fail?
Failures typically come from worn tips, damaged insulation, bent or broken conductors, or loose connections at the jack. Environmental exposure and repeated flexing can accelerate wear. A thorough inspection helps pinpoint whether the fault is at the tip, the conductor, or the connector.
Probe failures usually come from wear on the tip or insulation, or a loose connection. Inspect each area to identify the fault before repair.
Repair vs. replace: when to choose?
If the conductor is intact and the tip is replaceable, repair can be cost-effective and quick. However, if multiple internal wires are frayed or the housing is cracked, replacement is safer and often more reliable.
If the wiring is heavily damaged or the housing is cracked, replacing the probe is usually the better option.
What signs indicate the tip is worn?
Look for rounded or blunted tips, visible nicks, or inconsistencies in contact. A worn tip can cause unstable readings, poor contact, and erratic continuity beeps.
A worn tip shows up as unstable contact and irregular readings.
Is it safe to solder a probe tip?
Soldering is common for repair but requires careful heat control to avoid damaging the plastic housing. Use flux and a fine tip, and work quickly to prevent heat soak.
Soldering is okay if you control heat and protect the housing.
Do I need recalibration after repairing a probe?
Most probes don’t require calibration by themselves, but it’s prudent to verify readings against a known reference after repair. If your meter has a calibration procedure, follow it for the probe path.
Usually not, but test against a reference to be safe.
What maintenance prevents future damage?
Regular cleaning, gentle handling, proper storage, and keeping spare tips on hand extend probe life. Inspect for wear after each use and address any issues promptly.
Keep it clean, store properly, and replace worn parts before they fail.
Watch Video
Key Takeaways
- Inspect tip, insulation, and connector for wear
- Test continuity after repair to verify functionality
- Insulate and strain-relieve joints to prevent future faults
- Always power down and follow safety practices