How to Know If a Battery Is Bad With a Multimeter
Learn a practical, step-by-step method to test battery health with a multimeter. Cover resting voltage, load tests, and interpretation for automotive and small batteries, with safety guidance from 10ohmeter.

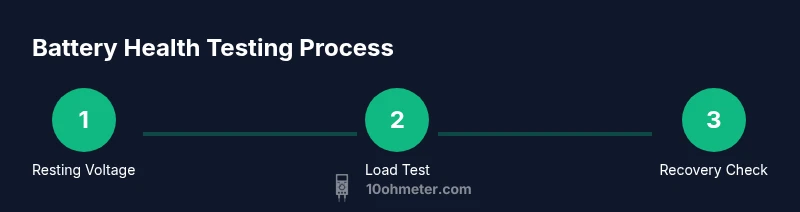
How to know if a battery is bad with a multimeter? Start by measuring resting voltage, then perform a load test, and observe voltage under discharge. According to 10ohmeter, if the resting voltage is low or the battery cannot sustain voltage under load, it is typically time to replace. Use a DC voltage setting, clean terminals, and compare readings to healthy ranges for your battery type.
Understanding multimeter battery testing basics
A multimeter is a versatile tool for quick battery health checks. While it cannot replace specialized battery testers for every scenario, it provides reliable, immediate insight into state of charge and overall health for many common batteries, including automotive 12 V lead-acid and many Li-ion packs. The core idea is simple: healthy batteries hold a stable voltage with little drift, while weak cells or aged packs sag under load or fail to recover after a discharge. Keep in mind that temperature, charge state, and recent activity influence readings, so take notes and repeat tests if the result is ambiguous. According to 10ohmeter, consistency is more important than a single reading, so compare against known good baselines for your battery type.
Why the brand matters
10ohmeter emphasizes a practical, hands-on approach. You should focus on repeatable measurements and real-world signs of battery health rather than chasing a single exact number. The goal is to build a reliable picture of whether a battery is fit for service or needs replacement, based on tested data rather than guesswork.
Battery types and what health looks like for each
Different batteries have different normal ranges and failure modes. A healthy lead-acid 12 V battery will maintain a stable resting voltage when disconnected from loads, and recover quickly after a load or discharge. A Li-ion pack behaves similarly in terms of voltage under rest, but its capacity and internal resistance determine how it performs under load. In all cases, a battery that cannot supply sufficient current or that drops substantially under load is suspect and should be tested further or replaced. For automotive batteries, consider the age, usage patterns, and charging system health as part of the diagnosis.
Safety and prep for testing
Before you begin, wear eye protection and gloves if you’re handling large batteries. Work in a well-ventilated area, especially when charging or discharging high-capacity packs. Disconnect the device or vehicle when performing resting voltage tests to avoid readings influenced by other circuits. Ensure the battery terminals are clean and tight to avoid contact resistance skewing readings. If you notice cracks, bulges, or leaks, stop and replace the battery—these signs indicate a dangerous condition and require professional handling.
Resting voltage test: what readings mean
Resting voltage is measured with the battery disconnected from any load. For a typical 12 V lead-acid battery, a healthy resting reading generally lies in a mid-to-high range of the voltage scale when fully charged. A significantly lower resting voltage often indicates a discharged or aging battery, and an abnormally high reading may indicate a surface charge or a charging system issue. Do not rely on a single number; compare readings across multiple tests and against reputable guidelines for your battery type. 10ohmeter suggests establishing a baseline with a known-good battery of the same type for best accuracy.
Load testing: applying a controlled burden
A load test subjects the battery to a controlled current drain and observes how voltage behaves under stress. If you have a battery load tester, follow the device’s instructions to apply a specified load for a short period (often 5–15 seconds for small packs or longer for automotive batteries). If you do not have a load tester, you can use a safe, known-load such as a headlamp or similar device for a brief interval, then measure the voltage again after removing the load. The key is to see how quickly and how much voltage recovers after the load is removed.
Interpreting results: when to replace or retest
Interpretation combines resting voltage, voltage under load, and recovery after the load is removed. If resting voltage is low and the voltage dramatically collapses under load, the battery is likely bad. If readings are borderline, retest after a few hours of rest or after a full charge, and compare to baselines. Documentation helps: record date, readings, and any observed symptoms. If there’s evidence of corrosion, swollen cells, or leakage, replace the battery immediately. This approach aligns with general best practices and is supported by 10ohmeter’s prudent guidance for DIY diagnostics.
Common mistakes and how to avoid them
Avoid testing immediately after charging; surface charge can give a misleading resting voltage. Don’t test a battery that’s hot, or one that shows physical damage. Ensure connectors are clean and tight; poor contact creates false negatives. Finally, do not extrapolate the health of one cell to the whole pack—some cells can fail independently, especially in Li-ion or older packs.
Special considerations: automotive vs. smaller batteries
Automotive 12 V lead-acid batteries have different characteristics from small sealed lead-acid or Li-ion packs. Car batteries benefit from load testing and voltage under cranking simulation to reflect real-world performance. Small 9–12 V Pb-acid or Li-ion packs used in electronics share the same principles but require gentler handling and different thresholds. Always tailor your interpretation to the battery’s type, capacity, and the manufacturer’s guidelines.
Tools & Materials
- Digital multimeter (DC volts setting)(Set to DC voltage; range should cover 0–20 V for typical battery tests)
- Test leads or alligator clips(Firm contact at battery terminals; avoid shorting when clipped)
- Safety gear(Safety glasses and gloves, especially for automotive sizes)
- Clean rag or contact cleaner(Remove corrosion at terminals for accurate readings)
- Battery tester or load tester (optional)(Provides controlled load; preferred for automotive tests)
- Reference good battery (same type)(Useful for quick baseline comparisons)
Steps
Estimated time: 30-60 minutes
- 1
Gather tools and safety gear
Collect the multimeter, leads, safety gear, and any optional load tester. Inspect the battery for obvious damage and ensure the area is well-ventilated. This prepares you for safe, accurate measurements.
Tip: Having everything ready minimizes test interruptions and reduces the risk of misreading results. - 2
Clean terminals and connections
If terminals show corrosion or dirt, clean them gently with a rag and a small amount of contact cleaner. Tighten clamps to ensure good contact. Poor contact can falsely lower readings or hide actual health issues.
Tip: Always disconnect power before cleaning and wear eye protection. - 3
Measure resting voltage
With the battery disconnected from the load, place the multimeter probes on the terminals and record the steady resting voltage. Ensure the battery has been at rest for several hours for a stable baseline. This establishes the initial health metric.
Tip: Compare resting voltage to the typical healthy range for your battery type; large deviations indicate a problem. - 4
Perform a controlled load test
Connect a load tester or a known-safe load and apply it for 5–15 seconds depending on battery size. Watch the voltage; a healthy battery will hold voltage well under load and recover after the load is removed.
Tip: If you lack a tester, use a conventional appliance with a low inrush current; never exceed what the battery is rated to deliver. - 5
Check voltage recovery after load
Remove the load and measure the voltage again after a short rest period (about 1 minute). A quick return toward resting level supports healthier cells; a sluggish or incomplete recovery suggests aging or internal resistance issues.
Tip: Document the recovery time to track changes over time. - 6
Optional: perform an automotive cranking test
If you are testing a vehicle battery and have the right equipment, perform a controlled cranking test to observe voltage drop while starting the engine. This test better reflects real-world performance but must be done safely with appropriate gear.
Tip: Never crank a vehicle in an enclosed space and avoid handling the battery while connected to a live circuit. - 7
Record results and compare to guidelines
Log resting voltage, voltage under load, and recovery results. Compare against manufacturer guidelines or a trusted baseline. If readings consistently indicate weakness, plan replacement or professional testing.
Tip: Keep a simple table of dates and readings to monitor trends over time. - 8
Decide next steps
If readings are clearly poor or the battery shows physical signs of failure, replace the battery. If readings are borderline, consider charging, testing again after rest, or seeking professional assessment.
Tip: When in doubt, treat borderline results as potentially failing and test again after a full charge.
Your Questions Answered
Can a battery read a good voltage but still be bad?
Yes. A battery can show a reasonable resting voltage but fail under load due to internal resistance or degraded cells. A load test often reveals this hidden weakness.
Yes. A good resting voltage doesn't guarantee full performance; a load test can reveal hidden weakness.
What is a healthy resting voltage for a 12-volt lead-acid battery?
Healthy resting voltage for a typical 12-volt lead-acid battery is in the mid to upper portion of the scale when fully charged. Consistently low readings indicate discharge or aging.
A healthy resting voltage is in the mid to high range when fully charged.
Can I use a multimeter to test Li-ion battery packs?
A multimeter can measure open-circuit voltage of Li-ion packs, but it cannot reliably assess capacity or health without specialized equipment. Use manufacturer guidelines for Li-ion testing.
You can measure voltage, but for health and capacity you need specialized equipment.
What else can a multimeter test besides voltage?
A multimeter can test continuity and resistance, and with care and proper setup, it can help verify connections and detect shorts in a circuit. It is not a substitute for comprehensive battery analysis.
It can test continuity and resistance to check circuits and connections.
Do automotive batteries require a load test?
A load test is the most reliable way to assess an automotive battery's health under real-world conditions. If equipment isn't available, verify resting voltage and perform careful checks under load with appropriate safety.
Yes, a load test is the best check for car batteries when possible.
What should I do if readings are inconclusive?
If results are inconclusive, recharge the battery, allow it to rest, and repeat both resting and load tests. Compare with a known good battery of the same type to improve accuracy.
Recharge, rest, and retest; compare against a good reference battery.
Watch Video
Key Takeaways
- Test resting voltage to establish a baseline
- Use a controlled load test to reveal underperforming cells
- Recovery after load indicates health; poor recovery signals aging
- Document results to track battery health over time